Sharp-Healy Family
The Story of the first two Generations
Links:
Websites:
- Wikipedia page on the Battle of Broodseinde
- A Wiki2 page on the Battle of Broodseinde
- Passchendaele Remembered
- A story about Passchendaele
- 90th commemorations at Tyne Cot Cemetery
- Panorama of Tyne Cot Cemetery
- Map showing progression of front line on Western Front following Battles of Broodseinde and Passchendaele, 1917.
- Maps showing original positions and results of Allied advances between 20 September and 4 October 1917.
- Battle of Broodseinde, 4 October 1917.
- Story and quotes of Battle of Broodseinde.
- Trench Map and outline of the Battle of Broodseinde, Australian Military History.
- Australians in the Battle of Broodseinde Ridge - October 4, 1917 including video.
- Freeman, John. A Planned Massacre? British Ineglligence Analysis and the German Army at the Battle of Broodseinde, 4 October 1917. An unpublished thesis. (pdf)
- Project Guttenberg Self-Publishing Press - a copy of the chapter on Broodseinde from a rare, out-of-print, collectible, historic book in html format.
- Massacre at Passchendaele - an RSA NZ web page with content by Dr Glyn Harper.
- Commonwealth War Graves Commission webpage on Broodseinde.
- 1917 and present day photos of Broodseinde Ridge.
You can also search on Google for keywords such as: battle of broodseinde new zealand division and view other images and maps online.
France
France is the final resting place of the family's First World War hero Denis Healy, which has been visited by Desmond Sharp. The involvement of Denis and Thomas Healy in World War One is documented in their personal stories.
4 October 2007 - 90th anniversary of the Battle of Broodseinde Ridge was a stunning success and New Zealand played a special part in it. The New Zealand division easily met all its objectives, advancing the British line by nearly 2,000 yards. However some 1,853 New Zealanders were injured and more than 449 were killed. And this was a battle where everything went according to plan!
This page describes:
- The Involvement of the Otago Regiment
- The Battle of Broodseinde Ridge
- Role of Stretcher Bearers
- Effects of Mustard Gas
The Involvement of the Otago Regiment
The 4th New Zealand Infantry Brigade was formed on 15 March 1917, and on 29 March, the 3rd Battalion of Otago Regiment came into being. On 30 March, 66 officers and 870 other ranks arrived from the New Zealand Infantry Reserve Group, Sling Camp. The Brigade immediately began a period of intensive training in musketry, and in Lewis and Vickers guns.

On 30 April, as a unit of the 4th Brigade, the Battalion marched from Codford to Sling Camp, near Bulford, to participate in a review by His Majesty the King of the New Zealand Forces in England. The march proved a rather exhausting experience for unseasoned troops, owing to the excessive heat and the long distance travelled. The Review was held on the Bulford Fields on the following day and was pronounced success. His Majesty the King, in a special message, expressing his appreciation of the appearance displayed by all ranks. The return journey to Codford was commenced early on the morning of May 2nd, when the Battalion was strengthened by the addition of more officers and men.
Training was continued under excellent weather conditions, and the standard of efficiency appreciably advanced. On May 10th the 4th Brigade was inspected by Field-Marshal Viscount French, who expressed himself as confident that the troops would uphold the best traditions of the New Zealand Division.
On May 25th orders were received for the 4th Infantry Brigade to move overseas. In the early hours of the morning of May28th, the 3rd Battalion of the Regiment at a strength of 35 officers and 928 other ranks, entrained at Codford, and commenced the first stage of its journey to the Western Front. The whole unit had detrained at Southampton Docks by 12 noon, and at 6 pm departed by transport for France. Le Havre was reached in the early hours of the following morning after an uneventful passage. Disembarkation was effected and the Battalion marched to the Rest Camp. There it remained until May 31st, when it entrained and proceeded to Bailleul, which was reached on June 1st. The Battalion went under canvas and on the following day was inspected by General Sir H Gough and Lieutenant-General Sir A J Godley.
Arrival in France
The new Battalion of the Regiment had arrived in France in time to witness the launching of the great Messines Battle, and although its participation in this operation was not active, it nevertheless played an important role in the rear. In accordance with operation orders the 4th New Zealand Infantry Brigade was to be held in Corps reserve, and was to carry out specified tasks under the direction of C.E. 2nd Anzac Corps. One of those tasks over the next few days was the repair of the Wulverghem-Messines Road.
Early in June, the Brigade occupied previously vacated German trenches, and assisted other Brigades by relieving them when necessary. On July 16th the Battalion moved up to the Brune Gaye, and from there supplied all working parties for the line. On the 24th the Battalion returned to the line; 10th, 8th and 14th Companies occupying the front system, and 4th Company being in reserve.
Over the next few weeks, the Battalion was in and out of the front line, and when billeted in local villages during rest periods, undertook considerable training, including attack practice in view of pending operations. This training culminated in a Brigade practice attack in the presence of General Godley.

On September 25th, the Battalion set out for the Lumbres area. The Eecke area was reached two days later, and from this point a party of officers made a reconnaissance of the line east of Ypres. The Battalion had covered a considerable distance by road, and while the comparative ease with which the march was accomplished, notwithstanding the warmth of the weather, proved the effectiveness of training operations, the two days rest which followed were greatly appreciated. The march was continued to a point two miles west of Poperinghe, where the Battalion entered Forth Camp.
The Move to Ypres
Orders were now received to move to the Ypres North area and the old British and German front line systems, Saint Jean sector. Less transport and cookers, Companies moved out at noon on October 1st, travelling by road and then by 'bus to Vlamertinghe, thence winding slowly in the evening light through the desolation of stricken Ypres, and finally reaching and bivouacking over the appointed area.
However it was in the first week of October that the 3rd Battalion of Otago Regiment was committed to its first offensive action.
The task of the New Zealand Division was entrusted to the 1st and 4th Infantry Brigades, each attaching on a two battalion frontage. The 4th Brigade, disposed on the right of the Divisional front, was committed to an advance of approximately 1,700 yards, with a frontage of 800 yards; the operation also including the capture of the village of Gravenstafel, and the small subsidiary spur running in the north-westerly direction from the main Passchendaele Ridge, known as the Abraham Heights. The first of the two objectives into which the advance was divided was approximately on the line Boethoek-Gravenstafel-Abraham Heights Spur, which was to be captured by the 3rd Battalions of Otago and Auckland Regiments, from left to right.
The Attack Programme

The attack programme provided for five barrages to take the infantry forward, to break up counter-attacks, and to protect the infantry when on their objectives; these being constituted as follows: (a) 18-pounder creeping barrage under which the infantry advanced; (b) 18-pounder and 4.5in howitzer; (c) machine-gun; (d) 6 in howitzer; (e) 60 pounder and 8 in and 9.2 in howitzer. The depth effected by these barrages was over 1000 yards, and in addition to the above, the super-heavy guns and howitzers were to engage special points of enemy defence. Arrangements were made for a total of 64 machine guns to barrage the Divisional front. After the capture of the first objective there was to be a halt of one hour and a-half before the 3rd Battalions of Wellington and Canterbury Regiments moved forward to the capture of the second or final objective.
On the night of October 3rd the positions of assembly for the attack, from 200 to 300 yards in rear of the existing front line, were arranged and taped out by the captain of the 14th Company and Captain N H Arden (4th Company).
The Battle of Broodseinde Ridge
Zero hour was 6 am on October 4th. Rain fell overnight and the morning broke cheerless and drizzly, with the sky heavily overcast. The early stages of the night had passed fairly quietly, save for intermittent shelling, but after midnight enemy artillery fire gradually increased in intensity, until at about half an hour before zero it assumed the fierceness of barrage fire and extended heavily to the south. This, it was subsequently learned, was the preliminary to an attack in force which the enemy was about to launch in an endeavour to regain the positions wrested from him during the British attacks of September 26th, and which our own attack but briefly anticipated.
An hour and a half before zero all companies had reached their assembly positions, and under increasingly heavy shell fire awaited the moment of attack. One of the front line Companies selected for the assault included 4th Company.
At 6 am our artillery broke out in thunderous concert with the enemy's guns, and moving behind a splendid barrage the Battalion advanced to an assault. The attack, once launched, moved forward without check until the main enemy resistance was encountered, consisting of "pill-boxes", machine gun emplacements, and fortified shell-holes along the slopes of Abraham Heights.
Captain Arden had been wounded early in the advance, but went forward to determine the most suitable line for consideration, and was there grievously wounded, dying a few moments after he had given his instructions. Command of 4th Company was now taken over by Lieutenant M Rohan, who took up a position about 40 yards in advance of the line taken up by the 3rd Battalion of Auckland. Later in the morning the New Zealanders joined up with the 10th Australian Brigade.
The New Zealand Division had on this day achieved a remarkable success. It had gained all its objectives, and captured 1,160 prisoners and a considerable number of machine guns. The 3rd Battalion of Otago Regiment, as its share in the operation, had also achieved substantial and decisive success, which was the more remarkable by reason of being the Battalion's first offensive effort. The Battalion's casualties totalled six officers and approximately 150 other ranks.
During the next few hours the troops consolidated their position, digging trenches, establishing communications, laying duckboards and mule tracks, and vigorously protecting their ground. On being relieved on the night of October 5th-6th, after command of the new Saint Jean sector passed from the New Zealand Division to the 49th Division, the Battalion trekked back to the point of bivouac near Goldfish Chateau. On the 6th the Battalion marched to Vlamertinghe, and from that point proceeded in buses to Steenvorde. From there a cold and miserable journey continued to Eecke, which was reached at 2 am on the 7th, and billets secured in the town. Opportunity was taken by the Commanding Officer, Lieutenant-Colonel Colquhoun, to address all ranks and compliment them on the splendid work accomplished during the course of the operations just concluded.
The Role of Stretcher Bearers

A soldier wounded on a Western Front battlefield might have been considered still to be fit enough to leave it as a "walking wounded". Otherwise he had to lie where he fell until picked up by stretcher-bearers.
Bringing in a wounded man on a stretcher was not merely a matter of getting him off the killing field. He then had to be carried along the trenches to an aid post. This meant negotiating the traverses and firebays, crowded with men intent on their task. Working and carrying parties needed to thread their way through the busy trenches and the stretcher-bearers had no priority of way. Often the only way they could move with their burden was to hold the stretcher high above their heads. They were glad when their charge was unconscious but often the wounded man would be writing in pain and perhaps screaming.
The bearers delivered the casualty to the Regimental Aid Post (RAP), which was usually in the second or third line of trenches. Here the Regimental Medical Officer (RMO) and his assistants applied or changed a dressing or gave injections. The doctor rarely attempted surgery beyond amputation and passed the wounded man back, again by stretcher-bearer, to the Advanced Dressing Station (ADS). Here another team assessed the wound and the doctor might decide on amputation or give treatment for haemorrhage or gas poisoning.
The ADS was so placed that it might be possible for an ambulance to pick up casualties for the next phase of the evacuation. This was to the Casualty Clearing Station (CCS) serving the particular division, where many operations were performed and professional nursing help was available. The surgeons staffing a CCS might perform two thousand operations a day during a big attack.
When it was possible - and when patients were strong enough - they were moved further back to field hospitals, general hospitals, stationary hospitals and, finally, to base hospitals.

Stretcher-bearers finished their task at the CCS and headed back for the line to collect another casualty. The hardest part of the stretcher-bearers' job came after a major battle when so many wounded men littered the field that it was not possible to rescue all of them. Then the bearers had to decide which casualties seemed to have the best chance of surviving. A man still living but with his intestines spilling out from a gashed stomach wound would not be a good bet. Despite the judgements the bearers made, they sometimes reached the RAP with a dead man on the stretcher. Equally, they might bring in an apparently hopeless case who survived. They became hardened to their work - else they would have gone mad.
Inevitably, in the confusion and under great pressure, and often in the dark, - the bearers missed many wounded men. Some of these managed to drag themselves into a shell-hole where they were certainly less likely to be wounded again but where stretcher-bearers might not see them. He they bled to death or slipped deeper into the often flooded hole and drowned. Even so, there were remarkable cases of men staying alive for a week or more until found.
Some men died slowly and often in agony in positions from which no attempt to rescue them was possible without the loss of even more men. Sometimes the Germans recognised a Red Cross flag waved from a trench and allowed bearers a brief time to bring in wounded, but more frequently the firing continued. Then from some shell-hole in No Man's Land, wounded men cried out in pain and begged to be helped. Some pleaded to be shot to end their suffering. Unable to bear a mate's torment, many a soldier dashed out on a mission of mercy only to be killed himself by an enemy sniper.
The Effects of Mustard Gas

Mustard gas caused the greatest number of gas casualties in the British and Empire armies. Between July 1917 and November 1918, the mustard gas period, 124,702 British and Empire soldiers were evacuated to hospital with blisters, burns or temporary blindness; 2,308 of these men died.
Research on the internet shows that the effects of mustard gas ranged from minor irritations on the eyes to death within hours of exposure. Doctors were unable to detoxify victims except by using superchlorinated bleaches. Many victims of mustard gas exposure developed cancer and suffered lifelong illnesses. Gas marks did not protect soldiers, and the gas would remain in the environment and on the ground for days, and can remain potent underground in a dry environment for up to ten years. If mustard gas contaminated a soldier's clothing and equipment, then other soldiers he came into contact with would also be poisoned.
Mustard gas was dispersed in munitions such as aerial bombs, land mines, mortar rounds, howitzer rounds and rockets. It was lethal in about 1% of cases, as its effectiveness was as an incapacitating agent.
More information can be found on www.firstworldwar.com or by searching the internet for the keywords "effects of mustard gas".
References
The following sources were used to compile the information on this page:
- Byrne, Lieut A E, MC, Otago Regiment NZEF. Official History of the Otago Regiment, NZEF, in the Great War 1914-1918, 2nd edition.
- Macdonald, Lyn. They Called it Passchendaele. The story of the Third Battle of Ypres and of the men who fought in it. 1978, Michael Joseph Limited, London.
- McCarthy, Chris. The Third Ypres. Passchendaele, the Day - by Day Account. Arms & Armour Press, London, 1995.
- Laffin, John. The Western Front Illustrated, 1914-1918. Kangaroo Press Pty Ltd, 1991.
Photos from Exhibition
The following photographs were taken from the Great War Exhibition in Wellington in February 2016.
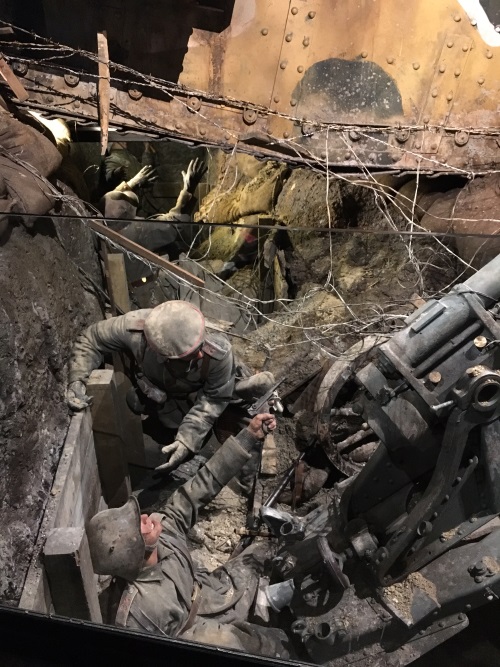
Exhibit showing example of life in a trench.

Exhibit showing example of life in a trench.

Exhibit showing a machine-gunner firing.
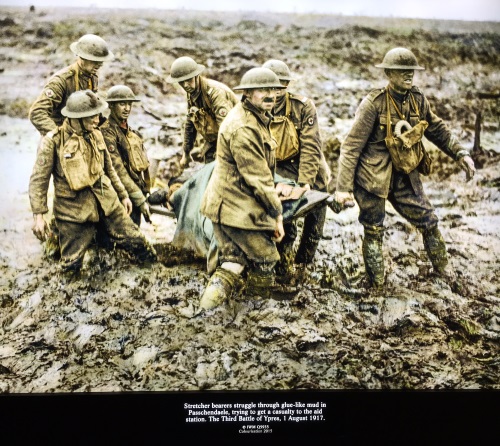
Photograph showing stretcher-bearers. This is what Denis Healy would have encountered. Caption reads: Stretcher bearers struggle through glue-like mud in Passchendaele, trying to get a casualty to the aid station. The Third Battle of Ypres, 1 August 1917.

Soil from Bellevue Spur, Passchendaele. Caption reads: This soil comes from the field that saw witness to the most tragic day in New Zealand's history - the failed attempt to capture Bellevue Spur on 12 October 1917. A preliminary barrage was supposed to destroy German barbed wire, but following an advance bogged down in mud, horrified New Zealand infrantry discovered the wire was still intact. Trapped in the open and stuck in mud, they were cut down by withering German machine-gun and artillery fire. 845 New Zealanders died, and 2,900 were wounded on 12 October 1917 - the greatest number of lives lost on a single day in our country's history.